Thursday 27 November 2014

Five things making my (beauty) life easier this holiday season ...


The hustle and bustle of the holiday season is fast approaching so I have a fun list for you all today! 

Time is limited for a lot of people all year round but especially now.  With Christmas parties, family dinners and last minute shopping, December can get pretty hectic!  Here are five things that are helping me make the most of my favourite time of year by spending less time on my beauty routine and more time with my loved ones. 

1. Kenra Platinum Blow-dry Spray


Photo Cred: Amazon.com
Whether you have hair like me (SUPER curly, coarse, frizzy and hard to manage) or just normal easy to style hair, no one loves spending a lot of time blow drying!  I tried this stuff about a month ago after hearing that it can cut dry time in half and I was sceptical.  Knowing my hair I figured, no way but I did want to still give it a try. Well folks I am here to tell you it actually works!! Not only does it cut down dry time but it has thermal protection so it keeps hair healthy while using all that heat.  As if all that wasn't enough it smells amazing and makes my hair super soft and shiny!  I don't wash my hair every day anyway, but I find when I use this I can go even longer without a wash - it's that good. Definitely a time saver for any time of year! Click here to check it out on Kenra's website!  Through that link you can also find out where near you sells Kenra products. 


2. Sephora Formula X Base & Top Coat 


This base and top coat are my favourite and now that I've started using them I can't go back! I talked about the polish in my Spring Favourites post but I don't think I mentioned the base and top coat! The base coat is slightly sticky so it really helps bond to the polish to help with staying power.  The top coat dries fast and is super shiny!  I almost always get asked if I'm wearing gel polish when I use these and can get about a week of wear time.  Again during the holidays I don't have time to be painting my nails every few days so these really help.  Of course gel or shellac would also last long but I love being able to just use regular polish remover to do a quick colour change rather than soaking the gel polish off.  


3. Bold Lipstick or Tinted Lip Balm

Ok, let's set the scene ... you are working all day and have to rush to a holiday party immediately after, leaving you no time at all to run home to freshen up.  How can you amp up your make-up in one easy step?  Add a bold lip! Bold lips look gorgeous with a simple eye so you can easily create a neutral work appropriate eye look and just before you get to the party, throw on some lipstick to glam it up! Here are a few of my favorites right now: 


Top L to R: Nars Fanny, MAC New York Apple, Bottom L to R: Nars Dragon Girl, MAC Plumful & GC Jewel
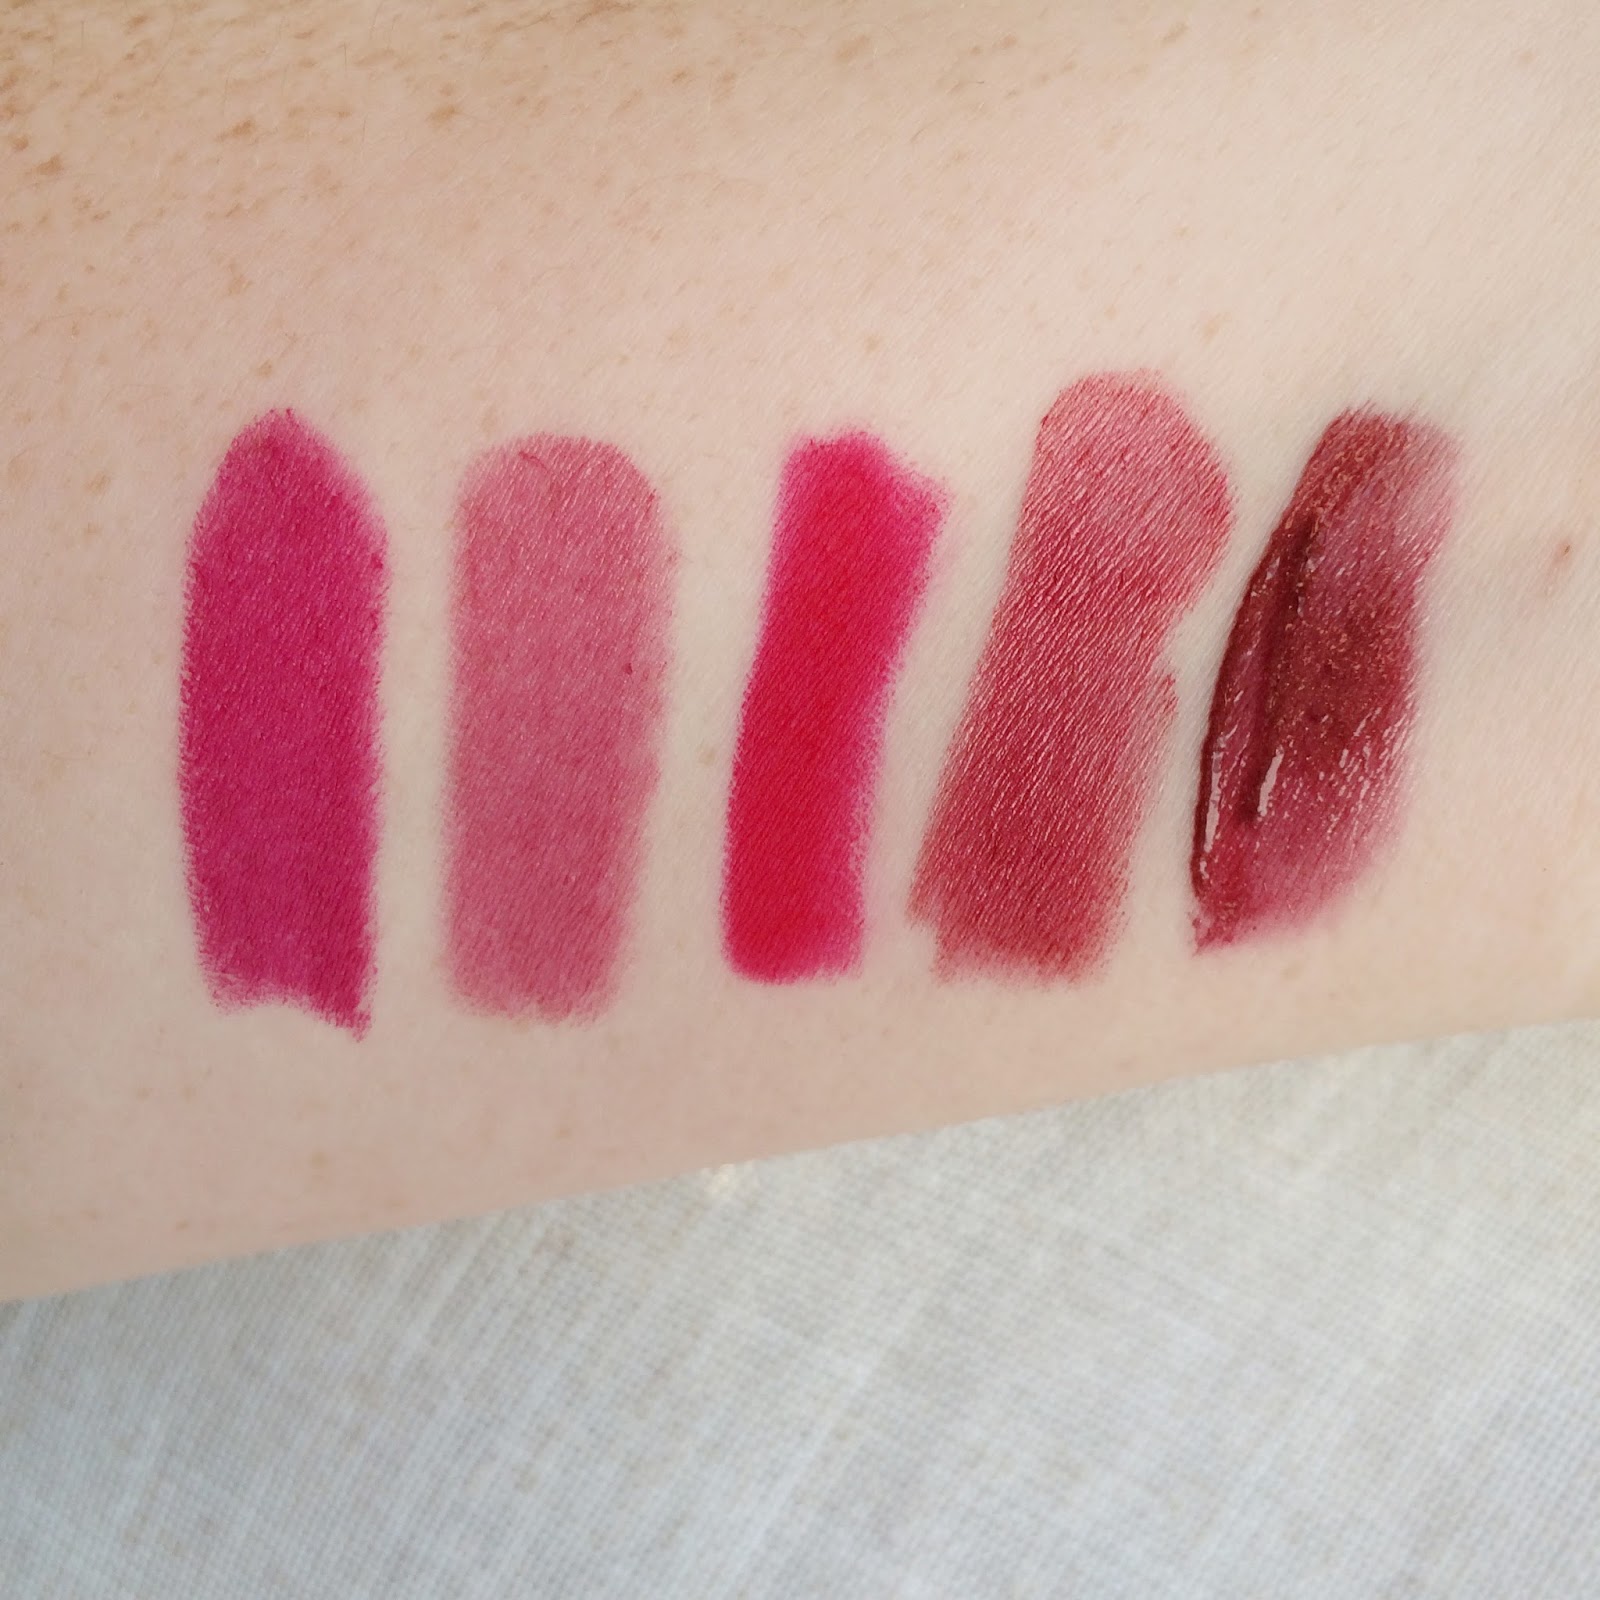
L to R: Nars Fanny, MAC Plumful, Nars Dragon Girl, MAC New York Apple & GC Jewel
1. Nars Audacious Lipstick in "Fanny" - This raspberry shade is totally my go-to this holiday season! The price tag is high on the new Nars lipsticks but the quality is amazing so I say it's totally worth it. 

2. Mac Lipstick in "Plumful" - This is a more subtle bold and easier to wear if you are scared of the really dark shades.  Mac lipsticks are definitely a holy grail for me.  


3. Nars Velvet Matte Lip Pencil in "Dragon Girl" - I love this matte lip pencil for the staying power and beautiful bright red shade (fun fact - this is Taylor Swift's go to red for her signature look!)


4. Mac Lipstick in "New York Apple" - This is a great color for those who want to experiment with red lips but don't want to go so bright.  This is described as a muted red with pink shimmer which makes it a little less scary! 

5. Gerard Cosmetics Lip Gloss in "Jewel" - This is definitely for those who want to go bold! This is a gorgeous rich ruby shade with tons of shine.  It's easier to maintain throughout an evening because of the little mirror and light on the tube! 


If you have a couple extra seconds, throw some champagne shadow (Stila "Kitten" would be perfect) on the inner corners of your eyes to really pull the look together! 


On the other hand, tinted lip balms are great for those busy shopping days where you are in and out of the cold trying to check everything off your list.  You don't have much time to worry about lip stick or gloss but want to keep your lips hydrated and still look put together.  I love tinted lip balms for this - you don't need a mirror you can just throw them on in seconds and hydrate your lips while giving them some life.  Here are my current favorites that give a really pretty rosy flush: 


L to R: Fresh Sugar Rose, It Cosmetics Lip Flush & Maybelline Baby Lips
1. Fresh Sugar Rose Tinted Lip Treatment - Super hydrating, smells gorgeous and has a really pretty rose tint!

2. It Cosmetics Vitality Lip Flush Stain in Je Ne Sais Quoi - This is a clear and moisturizing lip balm that reacts with each person differently to create the most perfect "your lips but better" rosy pink stain to your lips.  

3. Maybelline Baby Lips in Cherry Me - This one is easy as you can find it anywhere that sells Maybelline - I love the soft red stain this one gives the lips and the cherry scent is great! 


4. Stella & Dot Melanie Chandelier Earrings

Most of the chandelier or statement earrings from Stella & Dot transform from studs to chandeliers with little hooks on the back.  I don't mind spending a little extra on a piece that can be worn different ways and that's why I love Stella & Dot so much!  Check out these beauties, the "Melanie Chandeliers": 

These gorgeous studs can be put on in the morning and worn all day for work ... then when you're on your way to that Christmas party, simply add on the extra pieces to the earrings to create instant glam! 

It really doesn't get any more time saving than that!  You can check out all the other earrings that do the same thing (or any of the other amazing versatile pieces) at the following link:


 *psst ... the Peacock chandeliers (which also transform from studs to chandeliers) are on sale for Black Friday weekend!  
  
5. Benefit Gimme Brow 


Benefit Gimme Brow in Light/Medium
My last time saving tip to share is a product I fell in love with a few months ago.  Benefit's "Gimme Brow" is a tinted brow gel with a teeny-tiny brush that also attaches little fibers to the brows to give some volume.  This stuff instantly fills in the eyebrows and gives them a fuller look.  I usually use this in a combination with a brow pencil but on days that I'm in a rush this does the trick alone! The gel holds my brows in place all day too which is great so as I'm in and out of the cold and windy weather I don't have to worry about messy eyebrows! This comes in two shades, light/medium and medium/deep. 

* * * * * * * * * * 

If you're still reading this incredibly long blog post - thank you!! I originally planned this post to be short and sweet but as most people know, once I start talking about beauty related products I can't easily stop!  

Wishing you all a wonderful holiday season creating new memories with friends and family!   


Thursday 20 November 2014

The BEST Make-up Setting Spray!

Hey Friends!

In honor of the upcoming holiday season and the many parties most people will be attending, I have for you today the BEST makeup setting spray out there to keep your makeup looking fresh and perfect all night long! 

That product is .... Model In A Bottle!

Photo Cred: www.modelinabottle.com
I discovered this stuff online when I was preparing for my wedding three years ago (time flies!).  I like to research products a lot before purchasing and read as many reviews as possible.  This had amazing ones so I knew I had to try it.  

I purchased it a few months before my big day so I could really get a chance to test it out and see how well it really worked. The day my bridesmaids and I knew it was a good product was the day of my bridal shower.  It was a long and busy day so I sprayed all of our faces before we left for the shower. Well of course my Mom decided to say a beautiful and heartfelt speech that had all of us in tears!! As we all looked at each other crying we all burst out laughing because our make-up did NOT move.  I tried it more throughout the months leading up to the wedding and was convinced it was an amazing product.  

I did my own wedding make-up at about 10:00 am that day.  It was an extremely hot and humid day in August (trust me ... ask anyone from that day - it was HOT!!) and through a day of heat (outdoor ceremony), tears, laughter, photos, speeches, dancing, etc ... my make-up didn't move.  I'll never forget my sister in law came up to me at the very end of the night (about 1:30 am by this point) and told me my make-up still looked perfect!! 

One thing to keep in mind is this does have a strong perfumed smell.  Some people love it and some don't, so if you are sensitive to smells they also make a sensitive skin spray that is unscented.  

To use this, simply close your eyes and spray your entire face.  Keep your eyes closed for a minute or so to let it dry (sometimes I add a little bit of translucent powder over the spray once it dries just to really set everything).  This doesn't clog pores, has never caused breakouts on me and uses Aloe Vera extract to add some hydration to the skin as well.  

I really recommend this setting spray - check out the photo of me below taken at the end of the night after attending a wedding.  I did my make-up on that day in the early afternoon and this is a photo of me and my hubby about 10 hours later at the very end of the night (the only thing I had re-applied was lipstick!)

Check out www.modelinabottle.com if you want to purchase this stuff for yourself! 

Wishing everyone a safe holiday season filled with fresh makeup that lasts all night long!! ;)  


Friday 14 November 2014

Fall Essentials 2014


Hello! 

Once again I have unintentionally taken a big blogging break! I don't really know why - I'm not sure if I have just been uninspired or just didn't think I had anything to say that was blog-worthy. 

Well I remembered how much I loved blogging and have decided to put my mind to some new ideas and am going to start it back up with some fall essentials (I totally missed September and October favorites so I figured I would lump them all together!).  Fall has quickly turned to winter here in Canada - but since it is still technically fall, I will share some of my favorites with you! 

1: Nail Polish: Essie - Take It Outside, Bahama Mama & Penny Talk


L: Bahama Mama, R: Penny Talk
Essie: Take It Outside (I realized I lent mine to my Mom!) Photo Cred: nailsave.com
I have been wearing these three colors non stop this fall (and I'm not usually a repeat polish offender - I tend to always switch it up). 

"Take It Outside" is a neutral greige from the Essie Fall 2014 collection.  It matches with everything and manages to be the perfect fall shade without being too dark or too light (if you love the classic "Chinchilly", this is a lighter version). 

"Bahama Mama" is a gorgeous purple/plum shade from the regular collection so no need to worry about it being limited edition.  There is just something special about this color - it's a deep cream berry shade and somehow looks pink, purple, wine and plum all at once.  It applies beautifully in two easy coats and although it's deeper it doesn't feel like a dark scary polish.  This shade also looks gorgeous on any skin tone. 


How pretty is "Penny Talk"!!
"Penny Talk" is a polish that totally plays into the trend of the past year of rose gold.  Rose gold is gorgeous and although it felt like a fad early on I have a feeling it isn't going anywhere - I still love it just as much as ever.  Rose gold jewelry may not be for everyone but adding it into your life with a nail polish is a great way start!  It would be pretty any time of year but just screams fall and holidays to me.       

2. Lipstick: Clinique Almost Lipstick in Black Honey 


Top to Bottom: One, two then three swipes - see how build able it is, you can  choose your intensity 
I love the Clinique Almost Lipsticks - they are like a mixture between a lip balm and lipstick.  The color "Black Honey" initially looks a little scary (it totally looks almost black in the tube!) but when you swatch it it becomes the most beautiful berry/wine stain that looks different on everyone.  This was developed to be the "perfect" shade for every woman.  I don't remember where, but I did read that it is almost meant to resemble dried blood (AAHH gross I know! ... Sorry!) and that is the reason it looks good on everyone.  It enhances your natural lip tone beautifully.  It is also really build-able -because you can lightly put it on for a sheer wash of color, or layer it on its own or with a lip liner to intensify the pigment.  This quickly became a holy grail lip product for me.  So easy to throw in your bag and just put on at any time!   Don't be scared by the tube - I almost was but asked the Clinique rep. if I could test it and once I saw it on I immediately fell in love. 

3. Eyeshadow: Clinique Black Honey & Urban Decay Naked Palette 


Clinique Eyeshadow: Black Honey
When I purchased the Clinique lipstick I also checked out the "Black Honey" eyeshadow.  It is a beautiful warm burgundy/brown shade with a satin finish.  Clinique describes it as a "super shimmer" but I definitely don't find the shimmer overwhelming.  It's a beautiful shade for fall and I like wearing it lightly all over the lid then deepening the color in my crease.  I then take any matte cream shade to my brow bone and I'm good to go!  Super easy look for fall. 

Urban Decay Naked Palette
I have also been using my Urban Decay Naked palette a lot this fall.  I use it all year round but it's just perfect for fall with the warm brown and golden/bronze shades.  I love using "Naked" and "Buck" in my crease with "Darkhorse" on the outer half of my eye and on my lower lash line.  I also like to take "Smog" (a gorgeous bronze) and just put it all over my lid and add mascara for a quick eye look.  "Half Baked" is also the most beautiful gold and always a favorite - another one that I love to put on my lower lash line just to make the eyes glow!.  

4. Blush: Milani Baked Blush in Berry Amore & Hourglass Ambient Lighting Blush Palette

Milani Baked Blush: Berry Amore
The Milani blush in Berry Amore is gorgeous all year but I have been reaching for it a lot this fall. It's a pretty shimmery berry shade with some gold flecks.  I forgot about it during summer but reached for it again a couple weeks ago and have been wearing it non stop since! 


Hourglass Ambient Lighting Blush Palette
The Hourglass Ambient Lighting blush palette is not cheap, I will warn you of that now ... hey I gave you a drugstore favorite with Milani so you can't be mad at me ;) However ... it is gorgeous!  So, if you want to treat yourself to something special and you love blush I highly recommend this.  The Hourglass blushes are about $45 each, but you can buy this palette of three for $59.  I wrote about the Ambient Lighting palette in this blog post so you can check that out to learn more about the ambient lighting system.  Basically they are designed to make you look like certain types of light are cast on your skin. The blush comes with "luminous flush", "incandescent flush" and "mood exposure" and I really love them all!

5. Fresh Lotus Youth Preserve Face Cream

 I purchased this face cream in the summer because I was in need of something new.  I am really loving this stuff and have been using it as both my day and night cream.  I usually have dry skin but can get more normal/oily throughout the day so typically I don't like to use a cream I would use at night, during the day.  This stuff smells gorgeous (almost like fresh cucumber) and just smooths out my skin. It doesn't irritate (I do have sensitive skin when it comes to scented face products) and keeps it nicely hydrated all day without feeling greasy.  My make-up applies so nice and smooth after using this.  I never thought I would be able to find something good for both day and night but I did with this and I justify the higher price for that reason.  Plus, I never mind splurging on skin care - I have learned it is so worth it and my skin has totally thanked me for it. 

* * * * * * * * * 

So there are just a few of the things I have been loving this fall! Let me know if you have tried any of these or some of your fall favorites! 

Thanks for reading and sticking with me and my blog through a lengthy break! With the holidays just around the corner I am definitely planning some fun new blog posts!


Monday 9 June 2014

How I Painted my Kitchen Counters

Finally another kitchen update! A while ago I posted the final look of the kitchen and promised I would do a more detailed post on my experience with painting the counter tops! So here it is.

This idea was controversial to a lot of people.  We knew we didn't want to replace them due to the work and renovation process.  My husband and I after flipping our first house, renovating the basement in our new house as well as completely overhauling the bathroom (pics coming soon on that I promise!), are totally sick of renovations right now.  We aren't sick of house projects - we LOVE those! Just the idea of ripping things out, multiple trips to the dump, possible drywall repair, etc ... you get the idea.  
We know one day we will completely renovate the kitchen but now is not the time.  I did look into the counter top refinishing kits sold at Home Depot (made by Rustoleum) but just wasn't interested in the look and colors.  I also read they had a pretty potent smell meaning the kitchen would need to be well ventilated.  It still being pretty cold out at the time didn't really allow for that.  When comparing painting vs. the counter top kids they seemed to wear down the same way so again, I opted for the painting idea.  

Here is how I did it! 

1. Tape Edges

I usually don't use painters tape on edges when painting regular walls.  I would much rather buy a good quality paint brush and just be careful rather than taping it all.  I love to paint so over the years this has gotten much easier.  However, for this project there were a lot of little corners to get into and I wanted to make sure it was even so I just decided to tape all of the edges.  

2. Prime Counters


Next step is to prime the counters.  A good thing to do first is sand them down just to give the primer something extra to stick to.  I actually skipped this step due to being a little too excited to get started haha!  Plus this primer is awesome - it
 literally sticks to anything! I have even used this to prime vinyl flooring to prepare it to be painted and it was totally durable, no scratches.  I absolutely love it and it is always my go to.  


2. Paint!

Next step is to start painting!! I used the color "Swiss Coffee" by Behr - a nice classic white with a warmer undertone (wanted it bright and white but not 'cold').  I used regular latex kitchen & bathroom paint and a small foam roller.  I painted three coats to get a nice even color.  My original plan (and something you might want to do depending on your tastes) was to sand in between coats.  For this, the best is to use 220 sandpaper and lightly sand in between each coat once it is dry.  After sanding, use some tack cloth (a sticky cloth pictured below) to wipe off any of the dust.  This will provide a nice smooth look, however after my first coat I decided I really liked the textured look.  I thought the little bumps that the roller gave actually made it look like a real textured counter-top so I went with it!  


3. Protect


To protect the counters I used Minwax Polycrylic Protective Finish.  I went with this water based protector because it will stay clear rather than taking on a slight yellow tone over time (that would only be noticeable with using white paint so it was appropriate in this case).  Due to the water base, the Polycrylic also has a less intense smell and dries faster so it was a win-win!  I painted three coats of this with a good quality paint brush.  I tried using a roller but found with the white paint, little bits of dust were attaching to the roller and showing up. Using a brush was definitely the best way to go in this case.  I originally planned on doing more coats for maximum durability but figured I would stick with three and see how it wears (if I get chips I can just touch up at that time).  

This all took me about three days but that was because I did it in between working full time. If not for that I could have done it in about two days if you take in to account drying time.  


So far we only have two little chips on the edge of one counter.    I am totally OK with this as I hated the counters before that much that I don't mind a couple touch ups here and there.  Plus the little marks are things only we notice - no one else would probably even see them!  Otherwise we have been letting ourselves use the counters as normal.  In the beginning we were so cautious and careful but figured I can always touch up so let's use them as normal and see how much they can really take.  So far so good! 

If you have any questions about my process in doing this let me know!  I would be happy to answer anything for you.  Overall we are so happy with this project.  I will post an update in a few months or so when we see how they continue to wear over time! 

Hopefully this post helps you if you have a kitchen project in mind or are planning on painting anything where you need that extra durability (a bathroom counter, a vanity top, a desk, etc ...)  

Have a wonderful day and as always, thanks for the support! 


Thursday 5 June 2014

The Power of a Lipstick

home-3
www.breakupstomakeup.com
Last week I spent some time with my cousin/bestie in California after going through a rough couple of weeks. 

I knew we would be doing some major retail therapy and one item on the top of my list was a new lipstick.  I didn't want just any lipstick ... but a fancy lipstick.  I am a lip product lover in general but I knew a designer brand would be a way to feel kind of luxurious without totally breaking the bank.  Most designer lipsticks retail anywhere from $35-$45 (brands like Dior, YSL and Chanel, for example).  I could have purchased something else from one of these lines but to me, a lipstick was something I could use every day.  It is something I can pull out of my purse regularly and just feel a little more fancy while doing so.  

While discussing this, my cousin Paula reminded me of the story of the "Lipstick Effect".   The lipstick effect is something that happened during the recession a few years back when most retail sales seemed to decrease but surprisingly lipstick sales rose.   According to researchers at Texas Christian University, the University of Minnesota, the University of Texas at San Antonio and Arizona State University, the more insecure the economy, the more money women spent on beauty products.  Check out this arcticle from The Huffington Post for a little more info behind this theory.  

I didn't know about any of this but in my mind just knew a designer lipstick would be a fun new purchase.  I decided on a YSL "Rouge Volupte Shine" in the shade "8 - Pink in Confidence", a dusty pale pink that is perfect for every day wear.  I think when spending a lot of money on a lipstick you may as well get a shade that you can get a lot of use out of.  I didn't want something like dark red or hot pink that I would only wear on special occasions; I wanted something that I could put in my purse and be able to wear with any look.  Why spend $40 on a lipstick that I would only wear once a month!?   Although this was expensive, I know I will be purchasing more since the quality is so great.  The color is perfect and the formula is so creamy and comfortable on the lips.  It has long staying power and a beautiful shine to it.  I absolutely love the gold packaging and it definitely feels luxurious when I pull it out.  It almost reminds me of being a little girl and watching my Mom or other ladies pull out a fancy lipstick from their purse.  Being a lover of makeup my whole life, I remember being excited for when I got old enough to carry and wear a pretty lipstick.  


I've been wearing lipstick for a long time and have too many MAC lipsticks to even count, but this is my first designer lip product.  Maybe you think lipstick isn't your thing, but I'm telling you ... next time you're down, treat yourself to a new lipstick and see if it gives you that pick-me-up you might need.  Yes there's more to life than just lipstick and yes lipstick doesn't solve the world's problems ... but sometimes life doesn't need to be so complicated and it's OK to accept the fact that yes, a lipstick might make you feel better.  My new lipstick didn't solve my problems but it does make me feel confident when I put it on and that's good enough for me. 


Wishing you all a happy weekend! 


Tuesday 3 June 2014

I'm Baaacckk!! Spring Favorites

Hello lovelies!

Wow ... it has been a while since my last blog post!  A lot has been going on in my life these past  few months but I figured the best way to get back to being myself is to get back to beauty blogging! 

Since I am two months behind on monthly favorites I figured I would share some Spring Favorites and take you through the things I've been loving this season! 


This is a long one ... so grab a coffee, grab a snack and let's get started!!

1. Sephora Formula X Nail Polish


I have heard a lot of raves about this polish and being the nail junkie that I am I knew I had to try it.  This stuff is absolutely amazing and the hype is definitely worth it!  I am tempted to just sell all of my current polishes and buy every color of these (there are SO many to choose from)!  

Let me tell you something about me ... I have been searching for the perfect pink/nude/white/neutral nail color basically my entire life (first world problems, I know).  I have every Essie and OPI in that sheer pink shade just searching for the right one but am never totally satisfied.  I always find them too pink, too nude, too sheer, too opaque, etc.  With most, I need three to four coats to get the shade I want and then am stuck with nails that never dry and end up being forever tacky.  Ohhhh the hardships in life!  Well, enter Sephora Formula X in the shade "Remarkable".  In just two beautiful , easy and fast-drying coats I found myself praising the angels from above for sending this heavenly polish to find me (okay, okay, the dramatics can stop now).  Basically, I'll just end this now with .... try this polish people!! It's amazing!  I promise you won't be disappointed.         

2. Too Faced - Chocolate Bar Eye-shadow Palette
Photo Credit: Sephora.com
This is a recent favorite of mine as I only picked it up about two weeks ago but found I have been reaching for nothing else.  I love how versatile this palette is with mainly chocolate inspired browns with some pops of color mixed throughout.  I'll usually use one of the lighter brown matte shades in my crease and accent the outer corner with one of the darker shimmers. The bonus is this really does smell like chocolate since they use cocoa powder in their formula!  These colors blend SO beautifully and I have gotten many compliments on my eye looks with it that are so easy to create.  The palette also has two highlight shades (matte and pearl) that are in a larger pan.  I love this because those shades always get used the most as they typically can get put all over the lid or even used in other areas of the face for highlighting.  Check out my picture below with swatches of all the shades!  


3. Orla Kiely Garden Weekender Travel Bag (from Target)


Photo Credit: Target.com
 

This is a non-beauty favorite but is used to hold beauty products!  In the last two months I have traveled to both Florida and California and this bag was great for both trips.  As you can probably tell from this blog I like to use a lot of products so it can sometimes be hard for me to pack light - but this bag holds so much in a nice compact way.  It also has a brush holder in the middle which was great in helping me pack a smaller makeup bag.  I love the pattern and the fabric has a very nice and durable feel to it.  Since purchasing this bag I have also picked up two more in different styles that I'm loving just as much!  I recommend anything from the Orla Kiely line for Target and can definitely see myself getting more! 
Photo Credit: Target.com


4. Too Faced Perfect Lips Liner in Perfect Nude 

I find my natural lip lines kind of fade at the edges so this lip liner is great to just fill them in and create a nice natural looking line.  I have some other lip liner favorites (Stripdown from Mac is one) but I have found this one looks the most natural - it really is the "perfect nude"! Whether you have the same lip fading issue as me or you just need a new lip liner I think anyone would be very pleased with this one!  This is great with a nude lip but I use it with all of my everyday colors and it works as a perfect base.  The construction of this pencil is great too with a twist-up tip to always stay sharp and a comfort grip to help with precise lines.     

5. Bite Beauty Luminous Creme Lipstick in Fig


This is for sure a new holy grail lip color for me - the perfect neutral, rosy "your lips but better" pink.  Not only is this shade beautiful but the formula is in my top two favorites (MAC is my #1!).  One of my favorite parts of this brand is they use all food grade ingredients that are actually healthy enough to eat!  Considering we end up eating so much of our lip products this is pretty cool.  I find I'm always skeptical about "all natural" products actually working well but this is amazing ... I might even dare say they are better than MAC!  The formula is SO rich and creamy yet long wearing.  I find a lot of lipsticks can be very drying but haven't found that with Bite.  I had a chance to look at all of their shades the last time I was in Sephora and they are all beautiful!  If you are looking for the perfect nude I would check out "Retsina", and "Quinta" for another really pretty and neutral pink.  I wanted to purchase these shades but unfortunately the Sephora I was at was out of stock on many of them - a testament to this brand's popularity!

        
6. Tarte Amazonian Butter Lipstick


This is another great lipstick I recently tried and is wonderful for fuss-free everyday looks. The colors are very pigmented and bright but aren't too opaque so they aren't difficult to apply.  The term "butter" is so bang on as it literally feels like butter on your lips!  They have a minty feel/taste to them so they are almost a bit refreshing for summer.  I picked up the shades "Pink Peony" and "Watermelon" and my cousin purchased "Poppy" while we were out shopping.  These are all gorgeous bright summer shades and I have some swatches below.  The next one on my list is "Angelic Nude" - so pretty!  Oh ... and can we take a minute to appreciate the adorable packaging!  Too cute!! 


7. Caudalie Beauty Elixir


This is one of those products that is hard to explain.  This is a very expensive and fancy facial spray that I fell into the hype of.  I tried not to ... I tried to resist it and tell myself it was a ridiculous product that I did not need.  (Ok, maybe I didn't try that hard!)  I did pretty good and bought the travel size bottle (still, $20 for a small bottle is kind of crazy!) and, well, I fell in love.  I can't say what this has done for my skin, if anything ... but what I can say, is that when you need to freshen up your makeup halfway through the day, or if you need that extra pick-me-up for an early morning, or just that spa-like feeling after a great face mask ... this stuff is for you!  This literally smells like a spa.  Like ... if there were a perfume invented called "Spa" ... this would be it.  Last night for example, I was heading out to Target (as per usual) and felt like my face just needed to be refreshed.  I had worked a full day and was at the point where I just wanted to wash my face, but wanted to wait until I got home.  I simply sprayed some of this super sheer mist on and just felt so much better!  My makeup just looked fresh again and no longer felt so heavy.  Again, this could be all in my head but either way, I love it and it makes me feel good which is all that matters to me. :) 

8. The Balm Blush in Frat Boy


I've had this blush for a while and meant to mention it in previous favorites but then kind of forgot about it.  With the warmer months finally arriving I have been pulling this out more and find this shade really pretty for summer!  It looks great with natural skin tones or with a tan.   This finely-milled formula applies really smooth and creates a beautiful natural look.  This shade in particular is a peachy-coral matte but has a slight hint of shimmer to help give you a gorgeous glow.  The Balm  also has adorable packaging so that doesn't hurt either ;)


9.  Soap & Glory Sugar Crush Body Scrub


I picked this up a couple weeks ago because I needed a new body scrub and once you get one sniff of this you literally cannot leave it in the store.  I was happy to find out it actually works too so it's more than just a pretty face ... or ... pretty smelling scrub? You get the idea. :) 

The description of this from Soap and Glory is pretty great so I'll skip my attempt to describe it and just show you theirs:


Soap & Glory’s cult-classic Sugar Crush™ Body fuses freshly-squeezed sweet lime, 

sparkling lemons, sweet vanilla musk and almond oil, with sea salt, smashed brown sugar,

 glycerin and macadamia oils to leave your skin feeling smooth, supple, and sexy.

It smells amazing ... it works ... what more can I say!  If you are in the market for a new body scrub (especially with summer coming!), check this one out!  

10. Hourglass Ambient Lighting Palette


I had to save the best for last here.  
 
First, a little back story for you: 

I have been wanting to try the Hourglass Ambient Lighting powders forever (ok, since Christmas ... so 6 months - but that feels like forever to a makeup lover!) but didn't know if I wanted the price tag that comes along with them (one powder retails for $52!).  I also could never commit on a shade so didn't want to spend that much if I wasn't sure on what shade I wanted.  Basically the ambient lighting powders are super soft and finely milled setting powders and highlighters that mimic certain shades of light on your face.  To give you an idea, the shade names are; dim light, incandescent light, radiant light, diffused light, ethereal light, mood light and luminous light.  Check out Sephora's website for a great description of each.  

Well, when the limited edition palette that came out at Christmas had an online re-release due to popular demand (you get three shades in a palette for $67!) ... and it was my birthday month ... well it was basically like the heavens aligned just for me!  It was like, "Ohhh hey Alison, no big deal but we just re-released this palette you have been kicking yourself for not getting at Christmas just for your birthday ... you're welcome!"  Eeeek! Happy birthday to me!! 

Anyways ... back to the actual product.  The palette comes with Dim Light (a soft beige powder great for setting foundation and blurring imperfections), Incandescent Light (a beautiful highlighting pearl powder that is not at all shimmery but gives the most beautiful glow) and Radiant Light (a sun kissed golden beige to add a nice warmth to the complexion).  


I have to be 100% honest and say the first time I used these I didn't notice much of a difference.  I mean I noticed a subtle glow but nothing life changing.  I did notice they felt absolutely amazing on the skin and the packaging itself felt very luxurious. I knew the result was going to be natural and subtle and I didn't think it was something anyone else would take notice in.  I was starting to doubt the hype ... until one day after finishing my makeup and giving the powder another try,  ... my husband noticed it!!  Now, don't get me wrong he is very sweet and always compliments my makeup since he knows it's my passion.  He definitely always notices bigger changes like extra eyeliner, a different eye technique, a bolder lip ... but something subtle like this I wasn't expecting him to notice.  

He didn't know anything about this powder and had no idea what the purpose of it was but when I came downstairs told me my face looked like "beauty face".  If you have used a newer Samsung phone, you know what beauty face is.  Beauty face is a photo filter that basically softens your face, evens skin tone and blurs imperfections.  Hmmm, doesn't that sound exactly like my description of what this powder is meant to do!!???  Little did my sweet husband realize that he just convinced me that I now NEED every single ambient lighting powder!!  Sorry hubby ... your fault! ;) 

So after that extremely long winded explanation of the Hourglass Ambient Lighting powders, I will say that I am in love with these and they are totally worth the hype! 


* * * * * * * * * *

That's it for my Spring favorites!!  Hope you enjoyed this extremely long post and are inspired to try out some new products too!  I promise I have a lot more fun posts planned and coming your way soon!