Tuesday 28 January 2014

My Guacamole Recipe

Today I thought I would share with you my Guacamole recipe in honor of the National holiday coming up this weekend, Superbowl Sunday.  Oh wait ... it's not a holiday!?? You mean my husband has been lying  to me all this time!!?? Well, even if it's not actually a holiday, it is in our house! Jay is just a little football obsessed and has been hosting a Superbowl party for as long as I can remember! 

I have adapted this over my years of making it onto what it is today.  I can't even reference to you where I got the recipe because it's probably 2-3 different recipes all jumbled into one. I get lots of compliments on my guacamole so I figured it was a good Superbowl staple to share! 

Since I have changed this around so much it is very rough - meaning I don't know exact measurements.  Yes, I could make it again and measure exactly how much I use but the beauty of this type of recipe is you can just throw things in and adapt it to your personal tastes! 


ALI'S GUACAMOLE RECIPE 

Ingredients:

2-3 Avocados (ripe)
1 Lime
1/4 red onion (chopped) 
1 tomato, chopped OR roughly 1/4 cup salsa (I usually use tomato because I like the fresh taste but if I'm out of those, I throw in some salsa instead!)
Splash of white vinegar
1 tbsp. plain Greek yogurt (you could use sour cream, but I have switched out any usual use for sour cream with plain Greek yogurt so that's what I use!)

**Optional ... splash of hot sauce or a jalapeno finely chopped if you like some spice! Again, add the amount of this to your own spice taste preferences

Instructions:

1.  Mash avocados (I like using a fork or potato masher!) and squeeze the juice from the lime into the mix.  A tip with limes is to roll it along the counter before you cut it in half to help release and loosen up the juice inside.  Next, cut the lime in half.  If you don't have a citrus press you can stick a fork in one half of the lime, twist it around and squeeze right into the avocado mix!  Depending on your flavor preference you can use only half the lime or go ahead and use it all!  As long as you have at least half to help keep the avocado from browning.   

2. Next you can throw in the onion and tomato and mix it up.  Add your jalapeno or hot sauce now if you decide to use it.

3.  Add the splash of white vinegar (for reference, I use roughly one cap full from the vinegar bottle).  I read this ingredient a really long time ago and thought it was kind of different but it is always the number one thing that seems to set my guac apart! It gives a nice tang without being too overpowering.  

4.  My favorite part is the Greek yogurt!  Most people don't even realize I put this in but it just adds a nice subtle creamy-ness and brings it all together.  You can use less or more, but I roughly just throw in a tablespoon.     

5. A lot of people add in some salt and pepper now but I usually don't.  I find if I'm serving it with tortilla chips those are salted enough and I'm not a huge salt fan in general.  With all the other flavors going on I really don't think it is needed anyway!  But, as with the rest of the recipe, if you like salt and pepper go ahead and toss some in to your taste preferences at the end.  


* * * * * * * * * * * * * * * * * * * * 


That is it!  Nothing too fancy but an easy recipe that can be adjusted to personal tastes or made really quickly.  I usually make my guacamole as late as possible (to prevent it from browning) so I like having a nice easy recipe to follow that is always a success!

I have heard if you add the avocado seed into your guacamole that will also help prevent browning.  

As I plan out the rest of my Superbowl snacks for our annual party coming up this Sunday I will come up with some more posts for you with my go to recipes!  Stay tuned football fans! 


Monday 27 January 2014

Makeup Tips: How to Cover Dark Circles

Hey Lovelies! 

Today I'm talking all about those annoying dark under eye circles!  Other than makeup, there are other ways to help get rid of these ... drink more water, get more sleep, exercise regularly, take your vitamins, etc.  I am also guilty of rubbing my eyes and this is a big no-no. The skin around your eyes is so delicate so you need to take care and be very gentle when touching that area of your face.  Finding a good eye cream is great too!  As I mentioned in a previous post, I was really happy with the "Benefit It's Potent" eye cream.  Finally, genetics can play a part so there's really nothing you can do to help that.  Not going to get into more detail about all of the above because, well, I'm not a doctor. ;) 

What I will get into more detail about is concealing them with makeup because that is something I am more knowledgeable about! 

If you are trying to cover by using your regular concealer and not getting the results you are happy with, you probably need to get yourself a corrector.  

A corrector is something you can use before your concealer to correct and cancel out the purple/blue of the dark circles.  A corrector is something that is pink or salmon in color.  The reason for this is simple ... if you look at the color wheel, the opposite of blueish green (the color of dark circles) is pink! Only problem is a straight pink can sometimes combine with blue and create purple ... and we don't want that! Because of this, you may need to look for something with a warmer undertone which is why I mentioned salmon.  Applying the corrector is only the first step; you then need to go over that with a regular concealer (more close to your foundation color) to help it all blend together.  

Are you confused yet?  Not to worry, I will show you some photos of how I do this.  As a bonus there are two  tutorials ... one using drugstore products and one using high end!  I like the result I get with both so if you are limited with budget and don't have access to the high end products, definitely give these drugstore ones a try!   


TUTORIAL #1: DRUGSTORE


Products Used: 

1. L'Oreal Magic Lumi Concealer in "Fair" as my CORRECTOR
2. Maybelline Instant Age Rewind Dark Circles Eraser in "Light" as my CONCEALER
3. Rimmel Stay Matte in "Transparent" as my SETTING POWDER
4. Real Techniques Contour Brush used with the setting powder 


As you can see in the above comparison photo on my hand, the corrector is a pink tone while the concealer is closer to a foundation colour.

Both of these products can be purchased in different shades (i.e.: the Magic Lumi pen has more yellow toned options and the Dark Circle Eraser has a pink shade).  Another perk with the "Magic Lumi" pen is it can be used as a highlighter in other areas of the face too! Who doesn't like a multi-purpose makeup tool!?


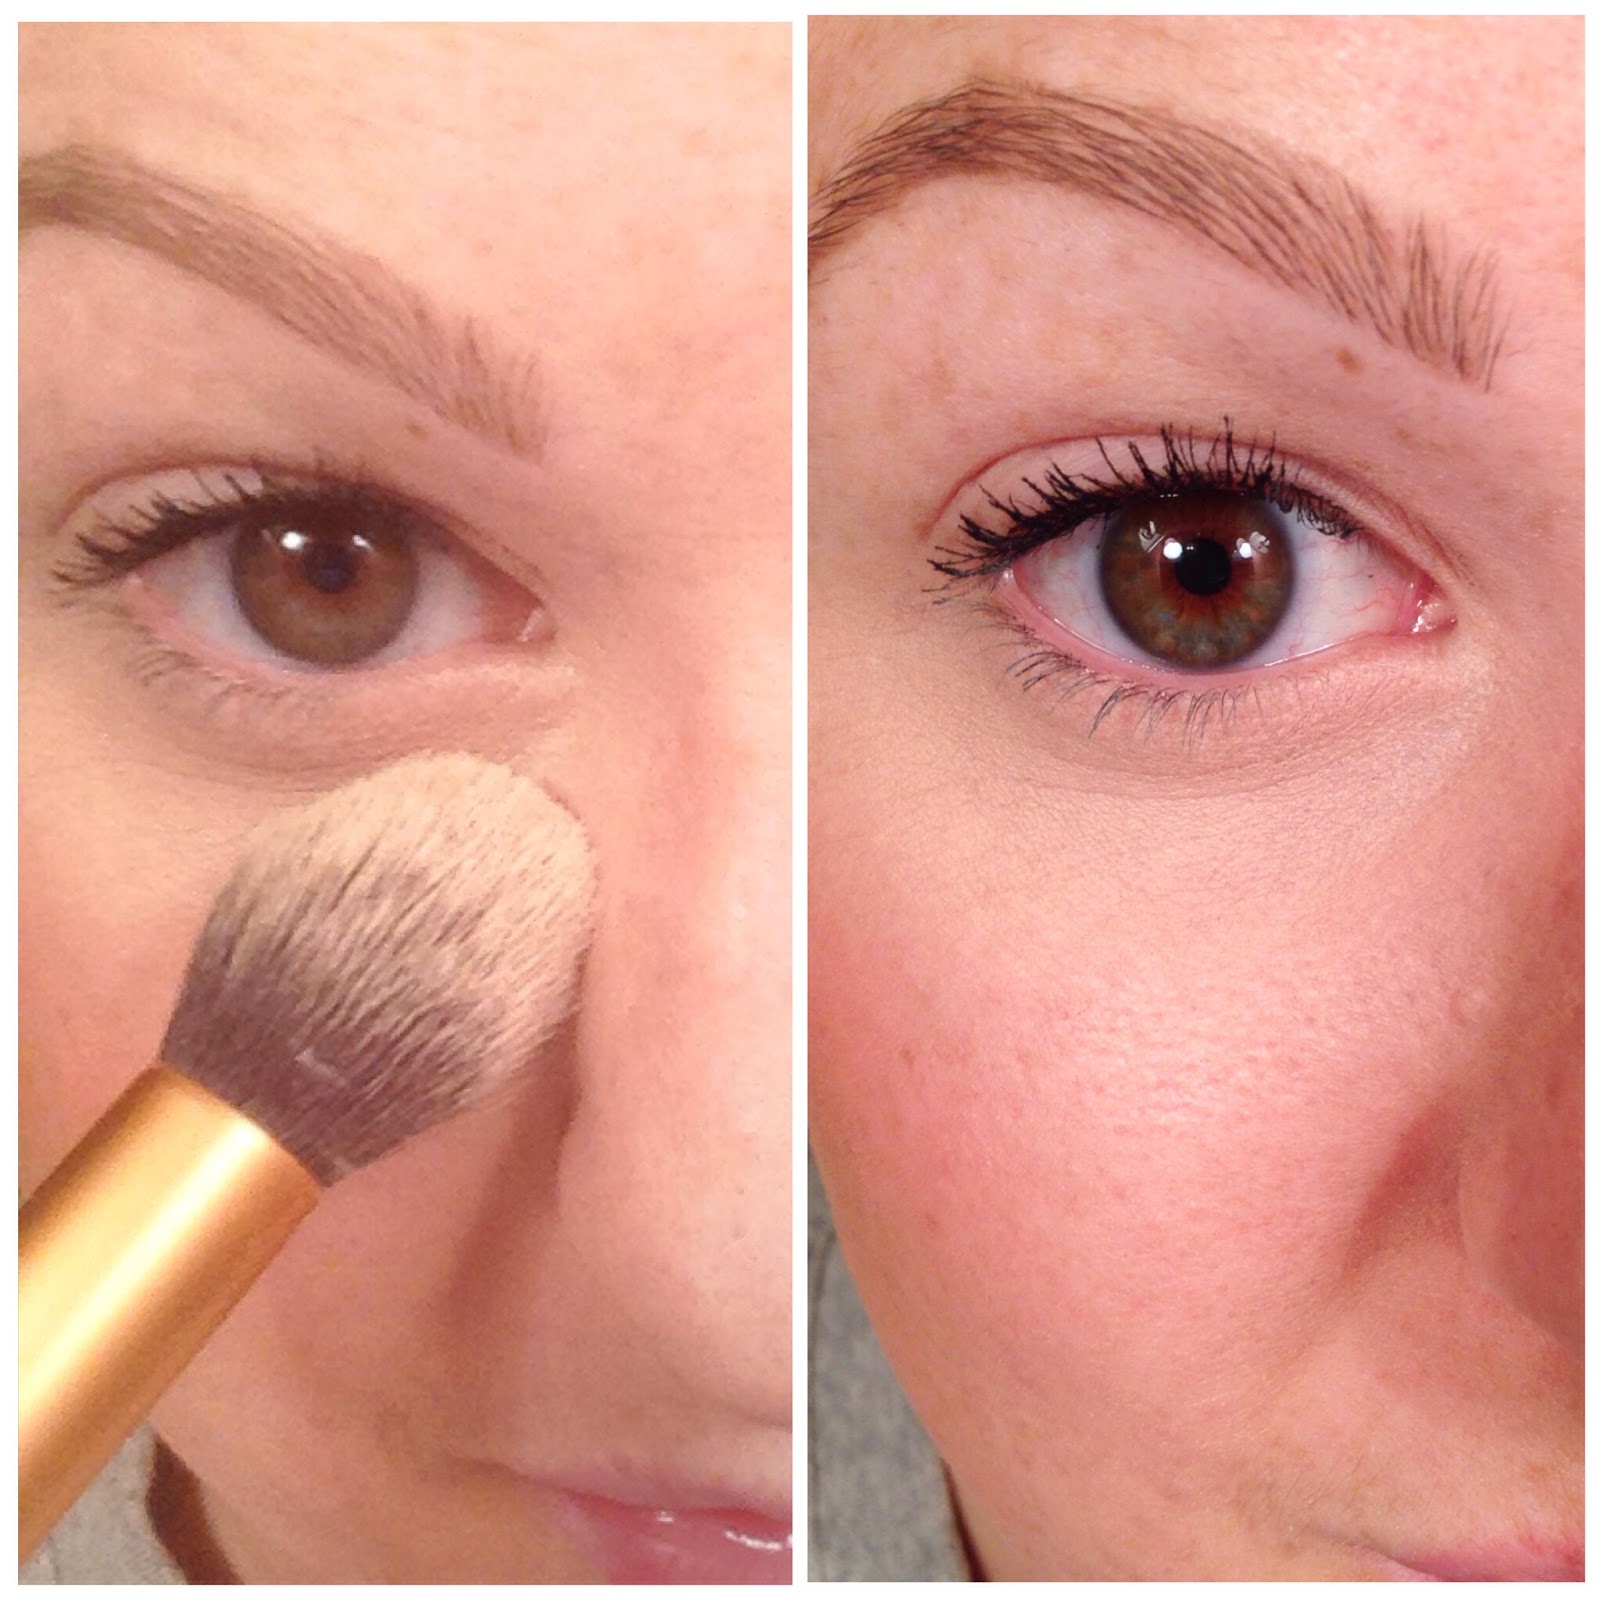
Steps 1 and 2 show me applying the corrector and blending with my ring finger.  Your finger is the best tool for blending these because it helps warm up the product to really melt into your skin and apply nicely.  Steps 3 and 4 are me applying the concealer on top.  A trick to help brighten your whole eye area is to apply concealer in a "V" shape going down towards your cheeks alongside your nose.  


In the above photo you can see me setting the whole thing with powder.  I love this brush because it is small enough to get into the corners of the under eye area.  Remember to pat the powder on and not rub or brush away everything you just did!  Setting the concealer with powder will help it stay all day long and not slide around your face.  

Below is the before and after! 


**Funny story about the before photo.  I swear this was the ONE day I didn't have bad under eye circles!  I'm happy about that but it really didn't help be show an accurate before shot ... but you get the idea!  :) 

* * * * * * * * * * * * * * * * * * * * * * * * * * * * * * * * * * * * * * * * * *  

TUTORIAL #2: HIGH END


Products Used: 

1. Bobbi Brown Corrector in "Light Bisque" as my CORRECTOR
2. Nars Creamy Concealer in "Vanilla" as my CONCEALER
3. Bare Minerals Mineral Veil as my SETTING POWDER
4. Real Techniques Contour Brush again used with the setting powder 


On a side note I have to say this Nars concealer has quickly become my new favorite! The drugstore ones I mentioned above are wonderful but there is something about this one I always reach for.  It is creamy and has such high quality coverage.  I find I achieve the same look with both the drugstore and high end products but the staying power of these high end ones really impress me.


I followed the same steps here as I explained above.  Steps 1 and 2 are using the Bobbi Brown Corrector and Steps 3 and 4 are showing the Nars Creamy Concealer on top. 


I used the same setting brush since it is my favorite and set the concealer with my Bare Minerals Mineral Veil.  I use this as an all over setting powder when I use my Bare Minerals foundation and love the final touch it gives.  It smooths out the foundation and really sets the whole look to a flawless finish. 

Here is a before and after comparison using the high end products.  


* * * * * * * * * * * * * * * * * * * * * * * * * * * * * * * * * * * * * * * * * * 

Below is a photo of the final look after I applied the rest of my makeup.  You really can't notice a difference so I really recommend either the drugstore or high end products.  Both feel nice on the skin and do have good lasting power.  I probably didn't need to even buy the high end stuff but you know I'm a bit of a product junkie and it was required for blog research! (hehe ... or that's what I tell my husband anyways!!) ;) 


So - the bottom line is find a corrector that has a pink or salmon tone and apply that to the inner corners to correct the dark circles.  Top the corrector with your regular yellow toned concealer, set it with some powder and you are good to go! Bye bye dark circles!! 

Hope these tips help some of you!  Let me know if there are any other makeup tutorials you would like to see! 

Have a great week!


Friday 24 January 2014

Bathroom Reno: The Before

I thought it was about that time to post my first blog about some home renovation projects. My hubby and I are a tad bit addicted to DIY-ing our home.  We love the satisfaction of looking at something and knowing we did it!  There can be a lot of long hours and little sleep involved when we are working on a larger project - but for us it is all worth it in the end!  

I grew up with a Dad who could build just about anything you ask him to and a Mom who is majorly crafty and an amazing seamstress ... so it's in my genes to be a DIY-er!   After a long day at work, I would much rather pick up a paintbrush than lay on the couch and watch TV all night ... it is my way of relaxing and clearing my head!  Thankfully my husband Jay is the same way so we make a great team!

We moved into our new house last spring.  My sister-in-law thankfully sent me a Kijiji ad of the most beautiful character home (was also only a few blocks away from the house we were in at the time).  I fell in love instantly and knew this house was meant to be ours.  It was a hectic and very quick move but we are so happy we did it!  We have always wanted a character home and this one was beyond perfect.  It was on the market for a few months so maybe not perfect for everyone's tastes - but to us it was love at first sight.  Since we love home renos (and we basically flipped our first house), we weren't scared of a little work ... but thankfully it didn't need a complete overhaul like our first home!  

One of our major renovations planned was the main floor bathroom.  It was outdated (but not in a good/character type of way) ... and just plain ugly.  The shower was annoying because it was tiny, yet there was tons of space for a larger shower!!  Our upstairs bathroom has a claw foot bath tub (*no big deal ... just kidding, only my favorite part of the house!!) so we knew we wanted to rip out the old shower and build a larger stand up one.  The cabinets were made out of a horrifically ugly melamine (I know ... I'm being overly dramatic) and one door was literally hanging by one hinge.  It really is a miracle we still have our toes because when that door would get knocked, the melamine corner would hit the floor so hard! (yikes!!)  The vanity sink and faucet were actually really nice ... granite and a Kohler faucet ... but we got rid of those because it just wasn't going to work with our new design ideas.  Ripping this bathroom apart was so exciting!! It was just all kinds of wrong!    

Here are a few before shots of the bathroom.  We are done now (aside from decorating - I'm still working on that!) ... so I will share with you all of the ups and downs along the way and how it all came together in future blog posts! 


* ouch!! 


* see all that wasted space beside the shower!?

Happy Friday (Hooray! ... You made it through the week!)  Let me know if you have any home renos on the go this weekend!  


Tuesday 21 January 2014

2013 Skincare Favorites

Continuing on with my favorite 2013 beauty finds; today I wanted to share some of my favorite finds in the skincare world!  
I fell in love with skincare products this past year.  I know I'm a little late to the game but I never had much interest in my teenage years and early 20's.  I was really lucky back then - I rarely had a breakout and had very normal skin.  I would regularly fall asleep with my makeup on (isn't that gross!!!???? I would never dream of doing that now!) and washing my face consisted of rubbing my makeup off with a facecloth and water.  

A couple years ago I guess my terrible skincare habits caught up with me and I found myself battling acne for the first time in my life!  Ok, "battling" is a little dramatic .... but that's how it felt since I never had to worry about it for so long.  I was also noticing more oily areas on my skin and dark circles under my eyes.  I didn't know what to do because I had never experienced this before, so I was definitely a newbie to the skincare world!  I have since found a combination of products which have worked really well for me so I am planning a post on my full skincare routine.  

For now, here are my favorite skincare finds from 2013!

1. Bioderma Cleansing Water


I don't know what I was thinking when I used to wash my face.  I would rub my face with a facecloth, then follow that up with my cleanser.  I couldn't figure out why my face was breaking out!  I would use a toner after cleansing and noticed so much makeup left on my skin and would get angry thinking my cleanser wasn't working.  When I thought about it I clearly wasn't effectively removing all of the makeup from my skin first.   

Enter Bioderma into my life.         

This stuff quickly became a holy grail product for me! The full name is: "Bioderma Crealine H2o Ultra-mild Non-rinse Face and Eyes Cleanser" (quite the tongue twister!) and it is a soap free, non foaming, non detergent, neutral pH makeup remover and cleansing water.  It gently and effectively removes every trace of makeup and even works to remove waterproof mascara!  I like another product for that pesky mascara which I will mention below but in a pinch this works too!  I have tried a couple other cleansing waters but what I love about Bioderma is it doesn't dry out my already dry skin!  The other wonderful thing about living in Canada is we can buy it here at Shoppers Drug Mart! You can also find it online but otherwise it can only be purchased in France! The price tag isn't cheap on this stuff (about $20 for a 250 mL bottle) but let me tell you it is so worth it.  My Mom and I have also found this at Shoppers Drug Mart in a pack where you get two bottles for $30 so we like to split the cost and that way only pay $15 each! 

I love how gentle this is in literally removing every trace of makeup.  It provides a great canvas for my cleanser to then really do it's job and cleanse my skin rather than fight through left over layers of makeup. 

That was a very long description but this stuff deserves it.  Obviously I highly recommend it!    

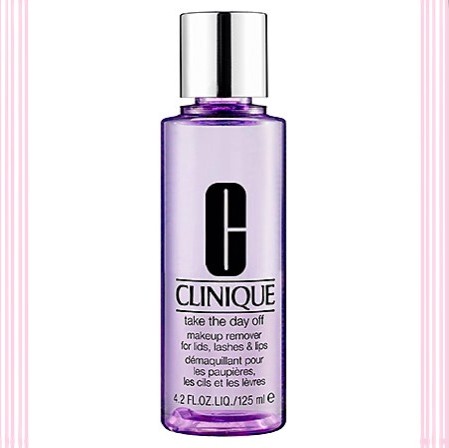
2. Clinique Take The Day Off Makeup Remover For Lids, Lashes & Lips


I have a hard time finding a makeup remover for my waterproof mascara.  I usually wear waterproof because my eyelashes seem to grow straight out, so I need some help in keeping them curled and waterproof formulas work great for that.  My all time favorite is actually baby oil but I find that hard to travel with and really messy in my bathroom cabinet.  I recently tried this Clinique makeup remover and love it!  This stuff takes off every trace of mascara and doesn't irritate my eyes or cause me to rub them too hard to get off the makeup.  Just as the Bioderma, it isn't cheap but I don't mind paying a little extra to know it works.  If you have just as hard of a time getting off your waterproof mascara give this a try! 

It also, as the name suggests, takes off lipstick and lip stains really well.  I experimented with a very bright and bold red lip recently before a night out and changed my mind.  I was thankful I had this as it took off every trace of red from my lips so I could start all over!   


3. Arbonne FC 5 Nurturing Day Lotion & Moisturizing Night Creme


My skin is typically dry so I like a good thick moisturizer.  I used to make the mistake of using a heavier moisturizer all the time, day and night.  I soon realized this was causing my makeup to not sit right throughout the day because my moisturizer was too heavy.  I switched to the Nurturing Day Lotion for daytime wear and the Moisturizing Night Creme only at night.   I actually look forward to putting these on my face every day - they are soothing, moisturizing and have a light fresh scent.  Usually scented products irritate my skin but this scent is so natural it has never caused a reaction.  I wake up with the smoothest skin and the day lotion sits so perfectly under my makeup.  Since I have normal to dry skin this line works best for me but Arbonne has a big range of products so I'm sure you could find something to fit your skin needs perfectly!  I also love that the day lotion has SPF in it which is so important especially for the face! 


4. Benefit It's Potent Eye Cream


 I am new to the world of eye creams but tried a sample size of the Benefit It's Potent eye cream and really loved it.  This is said to be a brightening eye cream to help fade dark circles (yay!).  My small sample lasted me over a month which was really impressive so you do get a lot of bang for your buck!  It is very also very hydrating and soothing to the eye area - didn't irritate my skin at all.  I decided to try a new eye cream once I ran out of this sample and although I like it it isn't targeted for dark circles and I recently noticed they are more prominent since I stopped using "It's Potent".  I am excited to use up my current eye cream and repurchase this one again! 


5. Kleenex Hand Towels


I know what you are thinking - what does this have to do with skin care?  I have been using these for about a month to dry my face after my cleansing routine at night rather than a towel.  I used to try and be diligent about using a specific towel only for my face but found I wasn't great at remembering to replace it that kind of defeated the purpose.  You could have a separate stack of small towels to wipe your face with every night but I just found that was creating a lot of laundry and I love the convenience of these hand wipes.  I keep them under my cabinet and pull one out anytime I wash my face and that way I know I'm getting a sanitary and clean cloth each time.  I have noticed a nice difference in my skin tone and way less breakouts recently and I think these have played a big part!  The boxes come in lots of different patterns too so they look really nice in any bathroom color scheme. 

* * * * * * * * * * 
Since I have become sort of addicted to skincare products I will definitely be posting more of my favorites as I discover them!

 ** I took a trip to Minneapolis this weekend and purchased some new stuff so I will keep you all updated on that!! **

As much as I love makeup,  it isn't something I want to rely on to feel good - when my skin is looking its' best I feel so much better about myself!  As an added bonus my makeup applies so smooth when my skin is looking and feeling good (and I use way less of it!).  Once you wash off all that makeup at the end of the day you are left with your skin and you want to make sure you are treating it right so you can look and feel your best.  

Happy Tuesday! Now don't forget to wash those beautiful faces tonight!! :) 


Thursday 16 January 2014

Organizing: Packing Tips

Hey Friends! 

As I started packing today to head out on a weekend getaway with the hubby, I thought I would share my favorite tip for packing!  I used to be terrible at packing (or should I say, over packing) for trips.  It's like all of a sudden I discovered that I actually loved every single piece of clothing I owned and couldn't go anywhere without taking my entire closet with me! 

** I really wish I felt like that while getting ready for a night out and can't seem to find anything to wear!!  Am I right ladies!??

Anyways ... I have always been a list-maker so one day while writing my packing list I came up with a new strategy.  I write down each day I will be gone and what events I will need an outfit for.  Now, don't get this mixed up with pre-planning my outfits because I don't necessarily do that. I get stressed out trying to plan specific outfits because who knows what I will feel like wearing on that specific day!  Instead I do something that looks a little like this:

Friday:

1. Driving Outfit
2. Concert Outfit
          - dressy outfit & brown boots

Saturday:

1. Shopping Outfit
          - comfortable outfit & taupe boots w/studs
2. Dinner Outfit
          - dressy outfit and black boots

Sunday:

1. Shopping Outfit
          - comfortable outfit & taupe boots w/studs
2. Dinner Outfit
          - dressy outfit and black boots 

Monday:

1. Driving Outfit 

By writing it out I know what I need outfits for and can narrow down my choices.  I go through each day and pick something suitable, then check it off the list.  I usually bring a couple options for each scenario that way I still have some selection (and yes that means I still over-pack - but not as bad as without this list!!)

Once I started writing my packing lists out this way I noticed a huge improvement in my skills (and have more room for my hair, makeup, jewelry, shoes, etc, etc, etc!!!) ... and find packing much less overwhelming.  

It's a simple tip and may be useless to some but it has helped me a lot so I thought I'd share!! Now ... back to packing!! :) 

I hope you all have a wonderful weekend and stay tuned next week because I will be posting my 2013 favorite skincare finds! 


Monday 13 January 2014

Make-Up Monday: Stila Eyeshadow

Hey lovelies!


Welcome to my first "Makeup Monday" post!  I wanted to keep it short today and just tell you about a new eye shadow I picked up this weekend.  As some people already may know, I've been obsessed with only MAC eye shadow for as long as I can remember.  I have every shade I could ever need and love the formula and pigmentation.  Because of this I rarely step out of my box and try new eye shadows.  This has recently changed as I have been wanting to try new things that I can more easily get my hands on (my town doesn't have a MAC counter so I can only order online).  

This weekend I spent some time browsing the cosmetic section of a Shoppers Drug Mart location that I don't make it to often and realized they have a whole Stila section!  Stila is a great makeup brand and I have tried a few things from their line in the past so I was so excited to discover this! 


I immediately gravitated to the eye shadows because I know the shade "Kitten" is a cult favorite in the beauty world.  I tried it on my hand and ... O. M. G. ... it was love at first sight! The formulation is beautiful and creamy (although not a cream shadow) and it is so highly pigmented!  One swipe on the back of my hand and I was convinced this was my new favorite shadow!  I have been wearing it for a few days now and it stays put all day long. After a long workday and a family dinner afterwards, I looked in the mirror and it looked just as pretty as in the morning when I applied it! It also had no fallout like a lot of shimmery colors can have.  


"Kitten" is a gorgeous shade - I have been using a light dusting of this all over the lid, then following up with a darker color in the crease for some definition.  It also makes for a perfect inner corner shade to brighten up the eyes.  I could see this color working well on a variety of skin tones because it is a shimmery, champagne/wheat-colored nude.  I would be careful on more "mature" skin due to the high shimmer factor as it may highlight some flaws or wrinkles in the skin that you may not want to be highlighted.  But, speaking of highlighting - this shade would also work well if you use a very light hand and highlight your cheekbones, brow bones, center of your nose, cupid's bow etc.  


If "kitten" isn't your shade of choice I would still recommend checking out other colors in the Stila eye shadow range.  This is definitely a new favorite for me and I am excited to expand my collection! 

Happy Monday!


Sunday 12 January 2014

5 Tips to Beat the Winter Blues


Baby, it's cold outside!  January is one of those months that I find can bring a lot of people down.  It's cold,  the pretty lights of the Christmas season are over and most people are broke from the hectic and expensive holidays.  Not everyone has winter activities to enjoy ... not everyone knows how to ski, skate, snowshoe, etc.  Although I do enjoy those activities, sometimes it is just too darn cold!

In honor of January I wanted to share some of my favorite things to do for beating those winter blues! 

1. Pamper Yourself!


One of my favorite things to do any time of the year (but especially in winter) is an at home spa night!  Start by having a long hot bath or shower and use this time to exfoliate your skin and apply your favorite face and hair masks.  Don't forget to moisturize with a body butter or deep moisturizer to combat dry winter skin.  Following this I like to make a cup of my favorite tea and do an at home manicure and/or pedicure.  I think it's so important to pamper yourself once in a while - it's not only good for your skin and body but makes you feel good inside too! 

2. Try a New Recipe

After a holiday season full of eating and drinking - I love to use January to do a bit of a detox.  I know it's cliche but the new year is a great time to start fresh and push the reset button on your body.  After a month of heavy eating I love to find new lighter recipes this time of year.   My favorite thing to make this month are homemade soups - they are light and healthy, but also warm and super comforting in the -50 degree weather.  If you aren't a big soup fan, why not check out your Pinterest food board and give some of those recipes a try!  You can check out my Pinterest here for some new ideas! 


3. Organize


Of course a new year is a perfect time to get organized!  If you are feeling overwhelmed with organizing just remember you cannot tackle it all in one day or even one weekend.  Getting your whole home organized takes time so don't stress yourself over not getting it done right away (I may know someone who should take her own advice on this one!).  So, since I actually DO tend to stress myself out over this - I made the goal of only one project per day/night.  If I have a busy evening, maybe that one project is simply de-cluttering one drawer in the kitchen.  If I have more time I'll tackle something larger like the linen closet or pantry.  Stay tuned for my posts in the upcoming weeks as I continue to organize my new house!     


4.  Travel

You are probably thinking ... "Ali, you said in your intro these are tips for when you are broke after the holidays!" ... but hear me out!  This year the hubby and I decided on taking a trip this month instead of expensive Christmas gifts for one another.  It is a simple trip to Minneapolis but we are SO excited to just get away and spend the weekend just us!  If you don't have a husband/wife/boyfriend/girlfriend ... why not plan a trip with your friends!  Again, it doesn't have to be extravagant, just a weekend trip can be so much fun and full of great memories!  So, next Christmas try suggesting a gift like this rather than something you really don't need.  I'm going to enjoy this upcoming weekend so much more than a silly bottle of perfume that I really don't need (although, Valentine's Day is just around the corner and I HAVE been eying up the "Roses de Chloe" perfume for a while ... Jay are you listening? *hehe kidding of course* ... sort of)  ;) 


5. Play Games

Plan a game night!  Whether it is just you and your other half or a big group of friends - you really can't go wrong!  Throw on your comfy clothes, grab some drinks and make some snacks!  We have done this with friends and played a variety of games but have had just as much fun with the two of us, a bottle of wine and a game of Yahtzee! 


Like I said, winter can get so cold and dreary so try one of these tips in those moments you are just sick of winter and need some inspiration to get through it! 


Let me know in the comments below any of your favorite tricks to beat the winter blues! 

Tuesday 7 January 2014

2013 Make-Up Favorites

Happy New Year!


To kick off 2014 I decided my first official blog post should be a review of my favorite 2013 beauty finds!  I have made some awesome discoveries in the last year so I am excited to share them with you!  

Since this has the possibility to be quite lengthy I have broken it up into three parts.  Today it's all about my favourite make-up finds!  I could talk forever about every single product I have and use but these are my favourite new finds from the last year.  So ... let's get started!!


Primer:

Benefit The Porefessional

I love this primer!  I discovered this in a sample kit I purchased from Benefit and find myself using it daily.  You only need a tiny amount of this because it is meant to only go on areas of the skin with larger pores so one tube will last you a long time!  I usually put it on my T-Zone and have been so happy with the beautiful canvas it creates under my makeup! 

Foundation:

Covergirl Outlast 3 in 1 Foundation

This foundation claims to be a primer, foundation and concealer in one - and I think it lives up to this claim! I have gotten away from heavy foundation in the last year and usually only use Bare Minerals (I will probably do a future post on my love for Bare Minerals ... let me know in the comments if you would be interested in that!).  Because I spend a good amount of money on Bare Minerals and other makeup and don't use liquid foundation often - I have been on the hunt for a good drugstore version for a while.  I like this for nights out or days when my skin is just not itself and I am wanting a more full coverage look.  I really love this foundation - it feels light on the skin but gives great coverage and blends beautifully! 

Powder:

Rimmel Stay Matte Powder

I have always been a MAC studio fix or pressed powder kind of girl ... but I heard about the Rimmel Stay Matte powder from some of my favorite YouTube beauty gurus and I have to say I am SUPER impressed!  I don't use a lot of powder anymore since like I said I've mainly been using the Bare Minerals foundation but when I want a touch up throughout the day or a setting powder for my Covergirl foundation - this is my go-to! Being so inexpensive is also a great perk!  I also love this for setting my under-eye concealer.  

Concealer:

Maybelline Instant Age Rewind Eraser (Dark Circles)

I don't usually need a lot of concealer for blemishes or discolouration on my face - I find the Bare Minerals foundation does the trick ... but in the last year I have really started to battle with under eye circles! (boo!!)  I let myself get a good enough amount of sleep when I can so I'm not sure where these came from - but this concealer does a great job of covering them up!  I used to use one of the MAC pro longwear concealers - but since I don't use a ton of it I like the fact that I have found a more inexpensive concealer option! 

Bronzer: 

Benefit Hoola

I have a lot of different bronzers that I love but a new find for me is the Benefit Hoola bronzer.  I love that it is a matte finish and isn't too dark - it gives a really natural flush of colour and is great for contouring!  In the summer months I will probably go back to my other favorites that give more of a shimmer/glow but for winter this is a huge favorite! 

Eyes:

Benefit Creaseless Cream Shadow

I LOVE the MAC Paint Pots ... but since I can't buy MAC where I live other than online, I was so pleased to find this cream shadow by Benefit this past year (which I can buy at Shoppers Drug Mart)!  It is a GREAT base for eyeshadow but is also lovely alone on the lids.  My favorite shade is "Birthday Suit" ... a beautiful shimmery taupe/bronze shade.   It really lives up to its' claim - it does not crease at all!

Urban Decay Naked 2 Palette

This is definitely a cult favorite in the beauty world but it took me all year to finally get my hands on this!! You will notice a theme here - I use a LOT of MAC products ... so since I have so many MAC eyeshadows in literally every colour imaginable, I wasn't immediately drawn to this palette.  I finally caved and asked for it for Christmas and oohhhhhh boy, when I opened this baby up on Christmas morning I was beyond excited!!!  Sorry to my hubby but I have found a new love! (hehe!!)  This pallete is filled with the most beautiful shades and I find myself reaching for it daily.  Now to get my hands on the Naked 3 pallette and my life will be complete.  :) 

Maybelline The Rocket Mascara

I have a hard time with Mascara - I have very fine eyelashes and they aren't super long ... so I like something that will give me both volume and length.  I try out new mascaras constantly but always go back to my L'oreal Voluminous mascara (which is still a favorite!)  This year I heard a lot of great reviews of this one and never would have otherwise thought to try it.  It has a rubberized brush similar the Covergirl Lash Blast (which I usually don't love) - but something keeps drawing me back to The Rocket!  Some people I have talked to don't like this but hey - it's worth a shot if you're in the market for a new mascara! 

Cheeks

Milani Baked Blush

I heard about the Milani line from some YouTube beauty videos and surprisingly found it where I live at Superstore/Loblaws (a grocery store)!  I'm not sure yet where else to purchase this line but I think in the States can be found at any drugstore.  I usually opt for more high end brands of blush but have been super happy with the Milani Baked Blush line because it is inexpensive, has great colour payoff, blends well and stays on all day! The colour I have pictured above is "Berry Amore".  This colour gives a pretty rose flush to my cheeks with a subtle gold shimmer.  I have heard great things about the shade "Luminoso" as well. 


Brushes

Real Techniques Brushes

These are absolutely amazing and very affordable brushes!! In Canada they can be purchased at Wal-Mart which surprised me since it wouldn't usually be my first choice for new brushes!  I have used other higher end/more expensive brushes and still love those but find these compare and hold up just as well!  Definitely check these out at Wal-Mart, or if you are in the US you can find them at Ulta!  I have been lucky enough to spot these at Winners too which is even better! My favorite so far is the "buffing brush" which I use to apply my foundation, and the contour brush which I love for setting my under eye concealer.     


Well ... that's it!  Clearly I could talk for hours about makeup!! I am planning on following up this post with my favorite finds from 2013 in the categories of skincare, nails and hair products so stay tuned for those! 

Let me know in the comments if you have tried any of these or some of your favorite new makeup finds!!